
Installation and Usage:
Simply download the zip archive, uncompress, and move Trash It! to a location on your computer (I recommend the desktop). If you run into any issues where it looks like it’s working but isn’t, please see this guide below:
Mac OS X Lion and later
Gatekeeper is a new feature in OS X Lion v10.7.5 and later, a technology that allows developers to sign applications. Internet files downloaded from other applications get file quarantine attributes but without date, time, and link of the file downloaded.
Gatekeeper options
Gatekeeper gives you more control over what you install. You can choose the safest option and only allow apps that come from the Mac App Store to open.
There is also the option of only allowing apps that come from the Mac App Store and identified developers. Or you can choose to allow any apps to open, just like previous versions of OS X, like Trash It!, on an individual basis.
Gatekeeper options are found in the Apple menu > System Preferences… > Security & Privacy > General tab under the header “Allow applications downloaded from:”
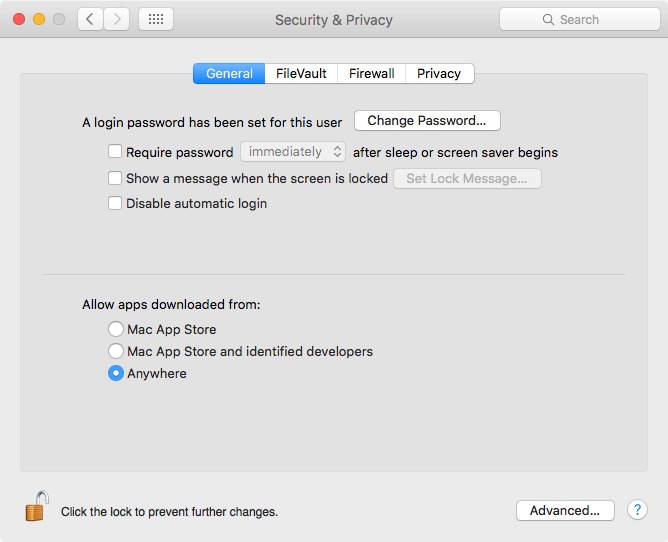
Select Anywhere if you get any error messages.
With the release of macOS Sierra and higher, Apple has made two changes in Gatekeeper:
1. Introduced a new security feature called “Gatekeeper Path Randomization” (GPR) – For more info, see Apple’s WWDC 2016 session What’s New in Security.
2. The Security & Privacy tab in the System Preferences pane now has two options, “App Store” and “App store plus identified developers”. The “Anywhere” option is not visible by default, which prevents users from disabling Gatekeeper and open the unsigned apps.

What should you do?
1. In order to launch apps created by unidentified developers, you will need to disable Gatekeeper or remove the quarantine flag for a certain app.
A. Disable Gatekeeper globally.
To restore the “Anywhere” option and disable Gatekeeper in macOS Sierra, open the Terminal app (Applications > Utilities) and type (or copy and paste and then hit enter):
sudo spctl --master-disable
Type your password when prompted, then press enter (characters will not be visible!).
If you wish to revert this change later (remove the “Anywhere” option), you can type (or copy and paste) into the Terminal:
sudo spctl --master-enable
Gatekeeper will be enabled again.

B. The second option allows you to remove the quarantine flag for each app individually.
Open the Terminal app and type (or copy and paste):
sudo xattr -rd com.apple.quarantine (with a space after "com.apple.quarantine"),
Then drag Trash It.app onto the Terminal window and it will autofill the /path.
It should look like this (if you moved Trash It to the Desktop as recommended):
sudo xattr -rd com.apple.quarantine /Users/YourName/Desktop/Trash\ It\!.app
Type your password when prompted, and press enter.
Drag ‘n’ Drop:
If you drop a folder or files onto Trash It!, it will delete only what you dropped on it, not what’s in the trash.
Double-clicking on the app:
If you double-click on Trash It!, it will delete what is in your trash.
All options are non-reversible after you click OK after you enter your Admin password*, so be careful with what you delete! If the file/folder you deleted is backed up in Time Machine, you can recover the file/folder following Time Machine’s instructions (below).
If you ran Trash It! and still see a full trashcan, please RESTART YOUR COMPUTER!
*USAGE NOTE ABOUT BLANK PASSWORDS:
If your password is blank, i.e., you have NO password, Trash It! may not work on your system. Trash It! uses the BSD Subsystem and blank passwords can cause issues. Apple appears to have fixed it with 10.10 or higher so your mileage will vary.
To get around this issue (It’s an Apple thing), CLOSE all open applications, go into your System Preferences > Users and Groups and change your password to something other than nothing. Run Trash It!, and when finished, go back into Users and Groups, and set your password back to nothing.
Persons using 10.10 or higher may or may not have this issue. Persons using Snow Leopard (10.6.x) will not be able to use Trash It! with a blank password.
If you are in any way connected to the Internet and are using a blank password, you are opening your entire system up to hackers trying to gain access. It is highly recommended you have a password, even if it’s a single letter. Do NOT use a space as a password or have spaces in your password.
Time Machine
If you accidentally deleted Time Machine files, this could take a while. First, Enter Time Machine. Then exit out of Time Machine. This will mount your Time Machine partition on your desktop.
First, try the ‘Fast’ button. If you still have files in the trashcan, then try the ‘Really Stuck’ button. See note below under the subheading Time Machine.
If you need to run it in 32-bit mode, do a Get Info (command + i) on the application and turn on “Open in 32-bit mode”.
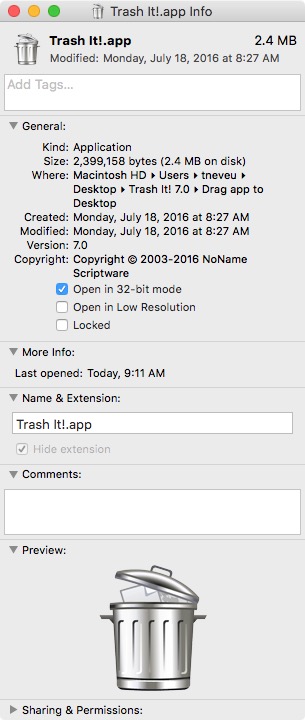
If you have a lot of files to delete, you can check off “Prevent App Nap.”
Previous versions are available on the Downloads page.
Time Machine files:
As of Mac OS X 10.7.x and higher, Apple has made it all but impossible to delete Time Machine files whether on a local or external drive unless you use Time Machine to do it.
Please read this article on how to do it somewhat quickly:
http://reviews.cnet.com/8301-13727_7-57597578-263/how-to-clear-unwanted-files-from-time-machine-backups/
Please go to our Blog for more issues (such as not having an admin password and uninstalling Trash It!).
Tips & Tricks:
Some disk optimization programs that free up hard drive space will move locked items to the trash. They are able to do this because you gave them Admin access when you entered your password. If that occurs, try the steps listed below.
Step 1. You have a file in the trash and it’s locked and Trash It! can’t delete it. Try creating a new folder, moving the new folder to the trash, and moving the offending files/folders into this new empty folder. Then run Trash It! RESTART YOUR COMPUTER!
Step 2. If that doesn’t work, take the stuck item out of the trash. Then drag and drop it onto the Trash It! icon. Make sure it’s out of the trash first. You may need to put it into a new folder first before the System will let you take it out of the trash. RESTART YOUR COMPUTER!
Please check out his posting regarding more Trash It Tips & Tricks.
DELETING SYSTEM FILES:
Sometimes you may need to delete some Apple system files or replace outdated ones that are derived from Unix. These are called Unix executable files.
Some of these can be found in the hidden directory ‘bin’ (From the Finder, select Go > Go to Folder and type in /bin (or shift+command+g). Some of these files include RAR and unRAR Unix files that you can download elsewhere and add the newest versions to your system so they are available for use via the terminal or other apps.
Mac OS X won’t let you replace existing system files (not just Unix exec) with newer ones, or let you delete them. If you try to move it, it will only make a copy of the moved file, leaving the original alone.
But if you drag the system file onto the Trash It icon, it will delete the file, allowing you to add the newer file into that directory. Once completed, run Disk Utility and repair permissions on your startup drive.
As a matter of good practice, you should repair permissions about once a week if using 10.9 or lower versions. This is the root cause of a lot of user’s problems. That option is not available in versions of OS X later than 10.10 as it appears to be deprecated by Apple and accessible via Disk Utility.
System Requirements:
Visit our Downloads page and choose the version that’s right for you!

[…] Instructions […]
[…] Instructions […]
[…] einem weiteren Forum bin ich dann auf die App "Trash It!" (Freeware) gestossen. Also auch diese Software runterladen und starten. Diese bietet dann nach […]
[…] Installations & Usage […]
[…] Installations & Usage […]
[…] Installations & Usage […]
[…] Installations & Usage […]