
Assigning a shortcut key to Trash It! can be accomplished in just a few easy steps, making it accessible from just your keyboard. However, this doesn’t apply to the dragging and dropping of items onto Trash It! for deleting stuck items, and only for people wishing to empty their trash more quickly without the hassle of having to double-click on the app all the time.
So, here are the steps to assign a shortcut key to Trash It! (They seem long, but I’m trying to cover all my bases, so bear with me):
1. Open the Script Editor (or AppleScript Editor) application in the Utilities folder in your Applications folder. Open the Preferences window, click on the General tab, and make sure that Show Script menu in menu bar is checked (see image below).
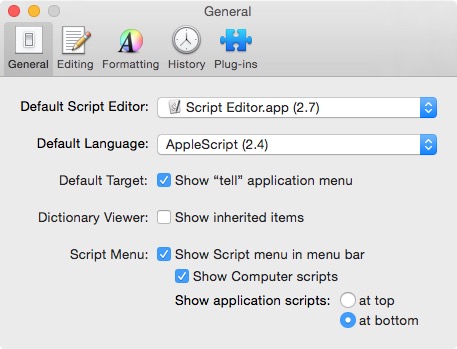
Figure 1
Close the preferences and quit Script Editor (command + Q).
2. Now that the Script Menu is turned on, your menu bar will have a little script icon that you can click on. Once clicked, it should look something like this:

Figure 2
3. Select “Open Scripts Folder” from the Script’s menu and it will show you where the scripts folder is on your Mac. Open the Scripts folder and move a copy of Trash It! into this folder (hold the option key when moving Trash It! to make a copy).
IMPORTANT NOTE: You can prevent shortcut key issues by moving Trash It! into the Applications > Finder folder inside the Scripts folder. If you don’t see that folder, simply create a new folder named Applications. Open that folder and create another folder called Finder. Put Trash It! in there.
See additional instructions at the end on this tutorial about this preferred method. This is how your Scripts folder should look in list view. (The Microsoft Outlook folder is for scripts used only by Outlook, so just ignore it).
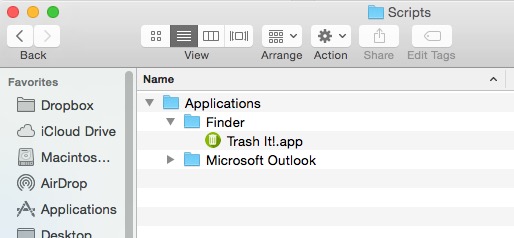
Figure 3
Depending on which version of OS X you are using, you may not have application-specific folders in your Scripts folder that work as I just described. If that’s the case, just leave Trash It in the root directory of the Scripts folder.
4. Now you can run Trash It! from that system-wide drop-down menu, regardless of what application you are using. Now we’re ready to add a keyboard shortcut to Trash It!. If you do NOT want a keyboard shortcut key assigned to Trash It!, you can grab a coffee because you’re done.
5. Apple doesn’t allow items in the Scripts menu (see Figure 2) to have keyboard shortcuts (Send them a polite email telling them to support it). But there is a workaround. If you would like to assign a shortcut key to Trash It!, you’ll need to download and install the very handy FastScripts (it’s free for up to 10 keyboard shortcuts!).
6. Once installed, launch FastScripts, and another Script icon will appear in your menu bar. Click on it and select FastScripts > Preferences…
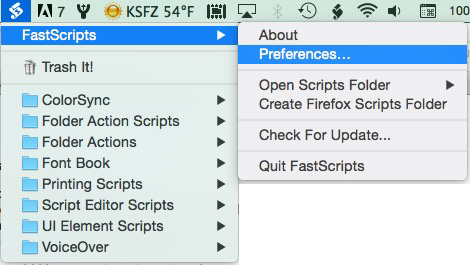
Figure 4
7. Once in the preferences window, click the tab “Script Menu” and check off “Start FastScripts whenever I log in to my computer”. This will ensure it’s still running between system reboots and logouts.
8. Choose the Script Shortcuts and where you see Trash It!, double-click on the word “(none)” to the right of it and assign it a shortcut key by typing in the keys like you would to use. The recommended shortcut key to Trash It is: command + option + shift + T
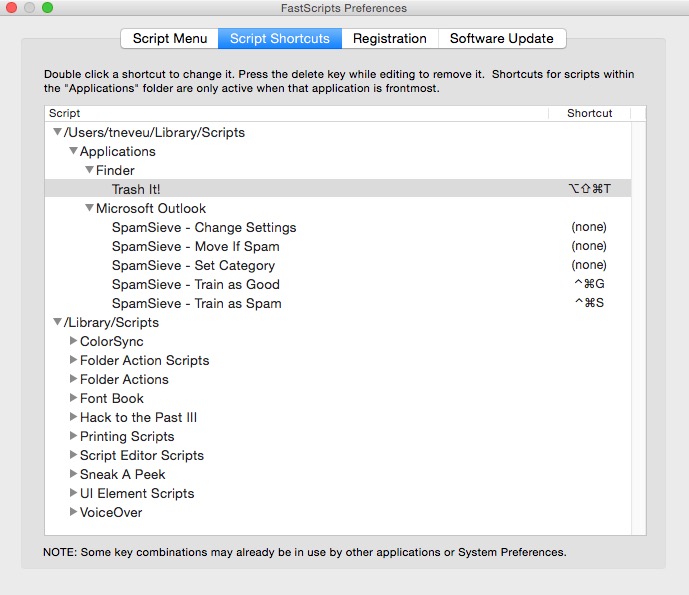
Figure 5
That’s it! You can now access Trash It! using a shortcut key. Wanna shorter shortcut key? Try out different combos, keeping in mind you may run into conflicts. For instance, command + T and control + T are already Finder commands. FastScripts will override those built-in OS X key combo commands and you may get unexpected behavior from your computer or Trash It!.
Additional Instructions
If you add Trash It! to the root directory of your Scripts folder, and you only want to run it using your chosen keyboard shortcut keys when you’re using the Finder (aka desktop), move it into the Applications > Finder directory inside your Scripts folder.
Figure 6: Here you can see that Trash It was added to the Applications > Finder directory inside the Scripts folder so that the key combo will only work when you are using the Finder.
This way if you’re using InDesign or another application, there is a far less likely risk of having a shortcut key combo conflict. In other words, the key combo for Trash It! will only work when you are in the Finder (To get the Finder, simply click anywhere on your desktop with your mouse).
If you’ve already assigned Trash It a shortcut key combo in FastScripts and decide later to move it to another location in the Scripts folder, you’ll have to re-assign the key combo again using FastScripts preferences window.
If the key combo you picked is causing strange behavior (such as the readme file for Trash It showing up in a dialog box), assign a new shortcut key using the steps outlined above in the FastScript’s preference window.
Be sure to check out our tips and tricks page and installation and usage guide, as well as liking our Facebook page so you’ll get instant updates on new software releases!
